DIY Camping Party Table Runner

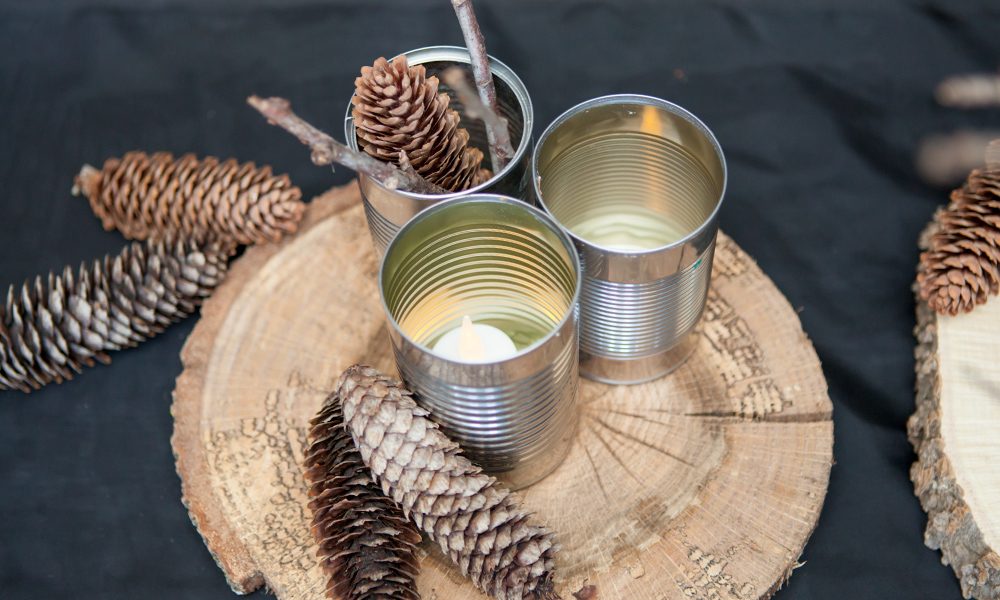
When it came to the table decorations, we wanted something super simple but super cute. As you can see, we didn't have to spend much money to get the table runner that we wanted. First we ended up buying a sheer black curtain that was about $5. We folded it to make it more of a runner. Then we had John, Brittnee's favorite father-in-law (haha), cut three tree slices. Is that what you call them? :) we also found that you can pick them up at the craft store. They are a little smaller and a little pricey but if you had a coupon you could pick them up for a reasonable price.

Then we used cans that we had in our recycling, sticks from the back yard, and pinecones that with our cousin, we pulled out of her tree. Finally, we added a few battery powered candles that we had lying around to finish up our runner.

Easy DIY Camping Party Table Runner (click through for details)

We love how it turned out! And we think it helped tie our camping theme together perfectly!! We hope you love it too! xoxo, Britt + Sky

Naked Birthday Cakes + DIY Toppers

My basic goals in mind for Noah's birthday cakes were cute and simple. I managed to pull that off for his single cake and the guest cake.  

Naked Birthday Cakes + DIY Toppers (click through for details)

The guest cake was so simple. I used two boxed cake mixes to bake 4 round cakes in 8x8 pans. Then I cut the tops off to make all of the layers flat. Using a spatula, I put a decent layer of icing in between the layers.  

For the topper, I purchased a set of cardboard letters at the craft store. I could have easily made the letters myself but chose to purchase them and put that time towards something else. I painted the letters gold and then using rubber cement, glued on the gold glitter. With kabob sticks pushed through the corrugated sections of the cardboard I stuck the letters on the cake. You may need to trim your kabob sticks depending on the height of your cake. 

Naked Birthday Cakes + DIY Toppers (click through for details)

For Noah's cake I actually used a large tomato juice can to bake it in. (Right after I cut myself on it while washing it of course) I had never done it before but I just greased the can really well and decided to go for it. 

I filled the can about half way with cake batter and placed it in the oven. I kept thinking I was going to burn it because it had to cook longer than normal. But it never did. I used a kabob stick to test it to see if it was done. Once it was done I let it cool in the can for a bit and then took it out of the can to finish cooling. 

After it had cooled, I cut of the top to make it even and then cut it into four layers. I then used a decent amount of icing in between the layers.  

For Noah's topper, I bought a number 1 candle at the dollar store. Using the same technique as the letters, I painted it gold and added our signature gold glitter. 

Naked Birthday Cakes + DIY Toppers (click through for details)

These cakes were both super simple but I really love the way they turned out! I hope you love them too!  xo, Britt

DIY Birthday Straws

Our diy birthday straws were a big hit! Everyone loved seeing the many expressions of Noah. So we thought today we'd show you what we did.

DIY Birthday Straws (click through for tutorial)

All we had to do was print our favorite photos with Noah's funny expressions. Brittnee photoshopped the heads and printed several on a piece of card stock. Next we had to cut them all out. Then we used washi tape to put them together. Its so simple but so cute!!

DIY Birthday Straws (click through for tutorial)

xoxo, Britt + Sky

Sneak Peek: Noah's Birthday

Happy Friday Lovelies! Today we have a little sneak peek of our plans for Noah's birthday party! We are so pumped about it so we couldn't wait to share. :)

Sneak Peek: Noah's Birthday

Have a great weekend! xoxo, Britt + Sky