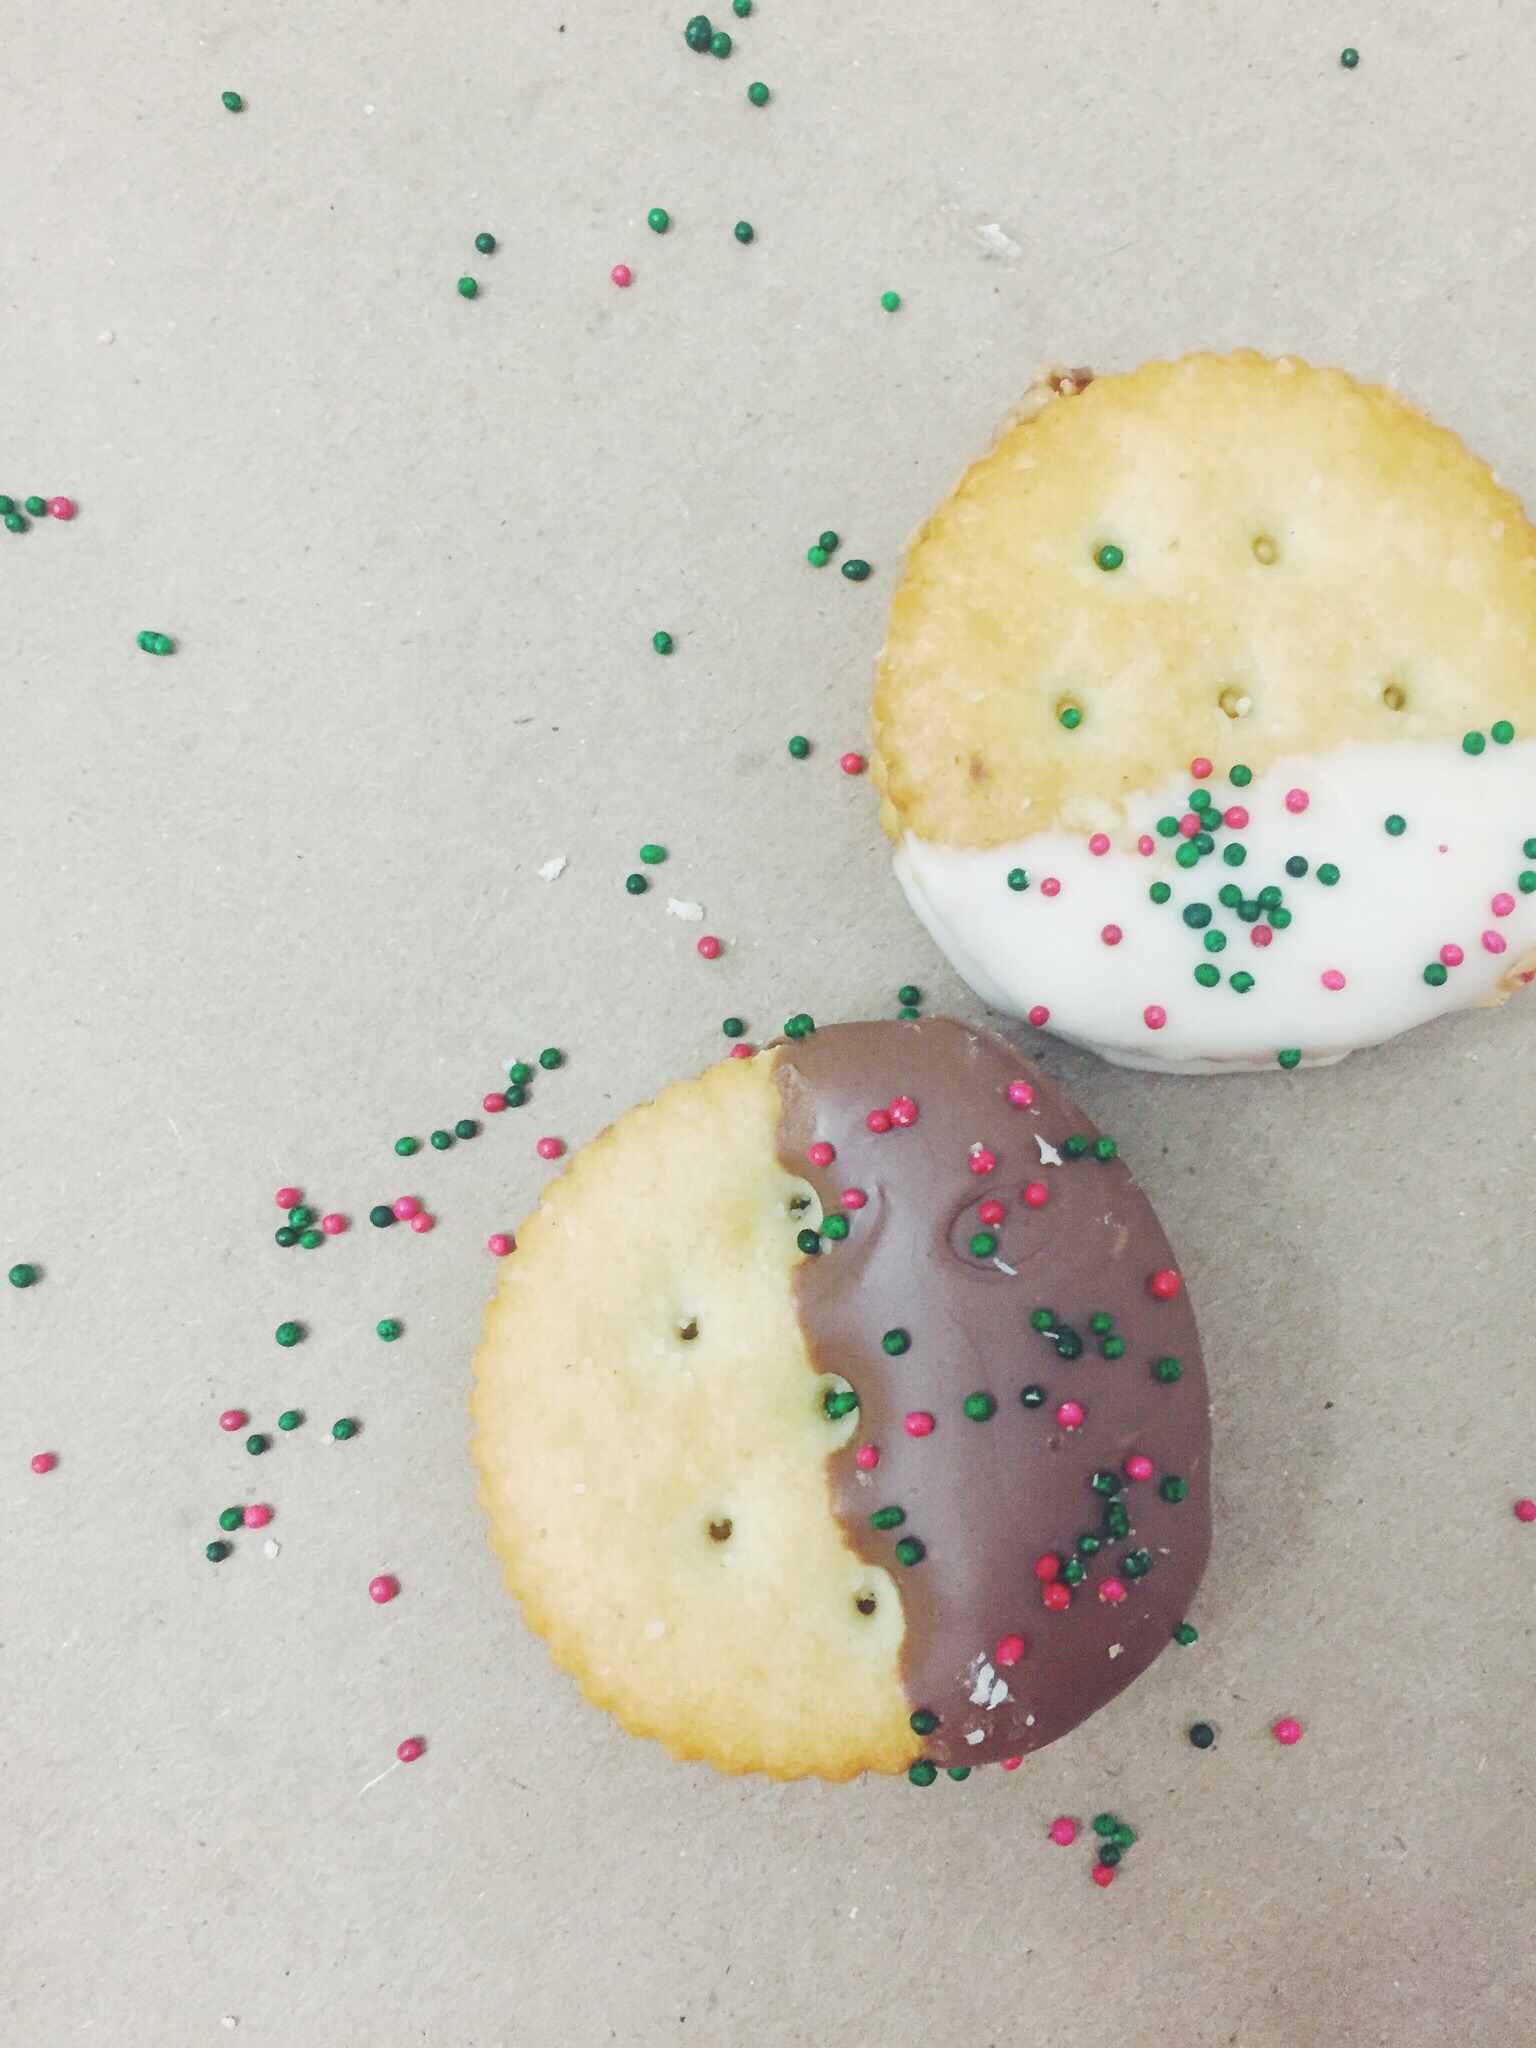
Christmas Cracker Treats

Today we have a wonderful, yummy treat you can make for this Christmas! These cracker treats are a delicious mix of salty and sweet. You can use caramel or peanut butter as a filling and white chocolate or milk chocolate as the outside coat.

Christmas Cracker Treats. Click for recipe

Here's what you'll need to get started:

  • 24 Ritz crackers
  • 6 tbs of peanut butter OR 6 Werther's Original chewy caramels
  • 2-3 cups of white chocolate OR milk chocolate
  • Christmas sprinkles
  • Wax paper

Filling

Peanut butter

If you are using peanut butter as your filling all you need to do is spread 1/2 tbs of peanut butter on a cracker. And then place the second cracker on top to make a peanut butter sandwich. If there is much peanut butter coming out the sides, try and wipe off as much as you can. Repeat this for all 12 cracker pairs, you should have 12 cracker sandwiches at the end.

Christmas Cracker Treats. Click for recipe

Caramel

If you want to use the caramel filling, first cut all of your chewy caramels into halves. Place one half onto a crackers, you should use 12 crackers. Place these 12 crackers onto a baking trey and bake for 3-5 minutes at 350 degrees. Watch really carefully while these are baking, you just want to leave them in long enough to melt the caramels but the crackers can burn easily. After the caramels are melted remove them from the oven. Immediately, and carefully, add the top cracker on top of the caramels. Let cool for a few minutes before removing from the pan.

Christmas Cracker Treats. Click for recipe

Chocolate Dipping

Once you have your filling done (either caramel or peanut butter or both!) it's time to dip these cracker sandwiches into the chocolate. Melt your chocolate (white or milk chocolate or even both) in a pot on the stove. Start at a medium heat, once the chocolate has melted put it on the lowest heat option. Dip your cracker sandwiches half way into the chocolate. Let the excess chocolate fall back into the pan and then lay the cracker sandwich onto wax paper. Immediately add sprinkles. Repeat this for all of your cracker sandwiches. After they are all finished allow them to dry completely before eating or storing! Make sure to store them in a sealed container to keep them fresh.

Christmas Cracker Treats. Click for recipe

Making these yummy cracker treats was a little messy, but well worth it! :) They are very good, but don't take our word for it. Try them for yourselves. You can make them for your Christmas party or for a gift for a friend. Or you can even just make them for yourself!

xoxo,

Britt + Sky

DIY Gift Card Holders

Some people are hard to shop for. And sometimes it's just easier to buy a gift card and let them buy what they want. Today we have two diy gift card holders that will make giving a gift card a little more fun. 

Pull-Out Card Holder

First we have a simple pull-out card holder that only takes three materials. All you need to get started is:

  • green paper
  • string or twine
  • washi tape
Diy Gift Card Holders. Click for more details.

1. Cut the green paper into a rectangle that is 7 in. x 2.5 in.

2. Fold the rectangle in half and connect the two longer edges with washi tape.

Diy Gift Card Holders. Click for more details.

3. Tape a loop of the string to the back of your gift card.

Diy Gift Card Holders. Click for more details.

4. Place the card into the opening in the card holder.

Diy Gift Card Holders. Click for more details.

The card can now be slid out with a tug on the string. It's simple but very cute. You can write a greeting on the front if you want to also. 

Diy Gift Card Holders. Click for more details.

On-The-Bag Card Holder

Sometimes buying and adding a small present to a gift card can be nice. They can use the gift card to buy something they want, but they also have something to open for Christmas. This next card holder can help you incorporate your card with your gift bag.

Here is what you will need to get started:

  • green paper
  • washi tape
  • sharpie
  • small red bow
Diy Gift Card Holders. Click for more details.

1. Cut a rectangle that is 8.5 inches  x 3.5 inches. 

2. Fold the bottom up creating approximately a 2 inch flap.

Diy Gift Card Holders. Click for more details.

3. Tape the edges of the flap to close it with washi tape.

Diy Gift Card Holders. Click for more details.

4. Add a message and your red bow to the flap.

5. Insert your gift card.

Diy Gift Card Holders. Click for more details.

6. Fold the top of the card holder over the edge of your gift bag.

Diy Gift Card Holders. Click for more details.

That's it! You know have an adorable card holder to go with your bag.

Diy Gift Card Holders. Click for more details.

Both of these card holders can be adjusted to any colors you choose. They can be made quickly and with just a few supplies. You really should try these for your holiday gift cards!

xoxo,

Britt + Sky

Simple Personalized Gifts

Christmas is in less than two weeks! And we are sure many of you have not finished shopping yet. But don't worry! It's not too late. Today we have some quick and simple diy gifts that are super cute. Homemade gifts are great for anyone you need a gift for and can be personalized for any type of person.


Monogrammed Planter

What you will need:

  • planter
  • orange acrylic paint
  • clear coat spray
  • plant
  • sharpie
  1. Print and cut out a letter. You can use either the persons first initial or last initial.
  2. Trace the letter on the planter with sharpie.
  3. Paint in the letter with the color of your choice.
  4. Outline your letter with black paint. Allow it to dry fully.
  5. Spray two coats of clear coat spray on the planter to seal it.
  6. Add your plant to the pot and give as a gift!
Diy Personalized Gifts. Click through for more.

We really love how our planter turned out. The color of our 'M' and the plant look together. This planter was very inexpensive and simple to make. 

Diy Personalized Gifts. Click through for more.

Painted Candle Jar

What you will need:

  • small jar (we found ours at a thrift store for 25cents!)
  • red Martha Stewart glass paint
  • sticker paper
  • pebbles
  • small candle
  1. Print a Christmas Tree onto your sticker paper (other shapes can be used also) and cut it out.
  2. Stick the tree 'sticker' evenly on your jar.
  3. Paint the rest of your jar red.
  4. Allow to fully dry. (At least one hour)
  5. Bake on 350 degrees for 30 minutes. Allow to cool at least 15 minutes.
  6. Add pebbles and your candle. 
  7. Wrap up and give to a loved one!
Diy Personalized Gifts. Click through for more.

This is also a very simple but cute present that almost anyone would love to receive. And you could personalize it in anyway you can think of: family initials, special dates, fun shapes, or anything you could print out or draw! 

Diy Personalized Gifts. Click through for more.

Personalized Mug

What you will need:

  • white coffee cup
  • red Martha Stewart glass paint
  • marshmallows
  • hot chocolate packs
  • sticker paper
  1. Print out a letter on the sticker paper. Cut out the letter.
  2. Place the letter center on one side of the coffee cup.
  3. Paint over the letter sticker, like shown in the picture.
  4. Let the paint dry for at least one hour.
  5. Bake on 350 degrees for 30 minutes. Let cool for at least 15 minutes before picking up.
  6. Add marshmallows and hot chocolate packs to the cup for a perfect gift!
Diy Personalized Gifts. Click through for more.

This makes for the perfect present. Everyone loves a personalized gift and hot chocolate! Now you can get two-in-one! It's a yummy and cute gift.

Diy Personalized Gifts. Click through for more.

With the short days left before Christmas these gifts are a great idea to make for the people left on your list. Store bought gifts can be nice, but with hand made gifts you can insure no one else will get them the same gift! These gifts are simple, inexpensive, and adorable. We suggest you try these for some of your presents this year.

Our Birthday Board we made awhile back is also a cute, personalized handmade gift that is perfect for someone in your family.

And keep watching this week for many more simple gifts to make for this Christmas!

Have a wonderful Monday!

Britt + Sky

Source: http://

DIY Hot Cocoa Bar

A hot cocoa bar is a perfect addition to any holiday party. There is really no right way to set it up, but we thought we'd share what we use for ours.

DIY Hot Cocoa Bar (click through for details)

Here's what we used:

  • kraft paper (got ours at the dollar tree)
  • permanent marker
  • candy canes
  • chocolate chips
  • marshmallows (our homemade ones, here)
  • plastic spoons
  • sprinkles
  • stir sticks (we got ours from the dollar tree)
  • spice jars (ours are from IKEA, here)
  • mason jars
  • other dishes
  • styrofoam cups
  • hot cocoa packs

Here's what we did with it:

DIY Hot Cocoa Bar (click through for details)

There are so many things that you can change up and personalize on a hot cocoa bar. Make it exactly how you like it, but we hope our set up and ideas inspire you! 

Have a great weekend!
xoxo
Britt + Sky

Homemade Marshmallows

Hot cocoa without marshmallows? Now that's just not right!
In these cold weather months, hot cocoa is a staple for us. As we started filling our cups with store bought marshmallows, we thought, why not make our own. Its always fun and interesting to see what actually goes into something that you are eating and we really liked the idea of making them different shapes. I mean you might as well have cute marshmallows in that cute mug, right?

Homemade Marshmallow Recipe (click through for recipe)

Candy thermometer
3 packets unflavored gelatin
1 1/2 cups water
2 cups sugar
1 cup light corn syrup
2 Tablespoons vanilla extract (or other flavoring syrup)
powdered sugar for coating

Grease the pan of your choice. (We used a cookie sheet with edges because we wanted thinner marshmallows, but 9x13 is perfect for thicker ones)

In a large bowl, mix half of your water (3/4 cup) and all three packets of unflavored gelatin. Cover and sit it to the side. 

Combine the remainder of your water (3/4 cup), 3/4 cup of your corn syrup, and the sugar into a pan and turn your burner to medium heat. Whisk together. The sugar needs to dissolve and the mixture needs to come to a rolling boil. Let this mixture get to 240 degrees (F). 

Once it has reached 240 degrees (F), mix in the remaining 1/4 cup of corn syrup.

While mixing on medium speed, begin adding your boiling mixture to your gelatin at a slow and steady pace. Once all of it is combined, mix on medium for about 10 minutes. Or until the ingredients have stiffened and tripled in volume.

Pour the mixture into your greased pan and try to smooth out as much as possible. Let these sit for 8 to 10 hours. We just made them before we went to bed and they were ready to go when we needed them in the morning. 

Cover an area of your counter with powdered sugar. Flip over your pan to release your marshmallow. Then cut your marshmallow into your desired shapes, coat with powdered sugar to keep them from being sticky, and you are good to go. Random side-note: We used star and bell shaped cookie cutters to make our mallow shapes. That left us with quite a bit of leftovers that we ended up just cutting into small pieces that are about the size of the small store bought ones.

Homemade Marshmallow Recipe (click through for recipe)

Place your marshmallows in a air-tight container and they can keep for about three weeks. 

Homemade Marshmallow Recipe (click through for recipe)

We love how the marshmallows turned out and how they looked in our hot cocoa! This is a super fun project to do for the holidays and is a huge hit with little ones. Have fun making mallows! xoxo, Britt + Sky